はじめに
この記事では、「Longruner LCDディスプレイ LK51」をArduino UNOとArduino Mega 2560で接続する方法を紹介します。
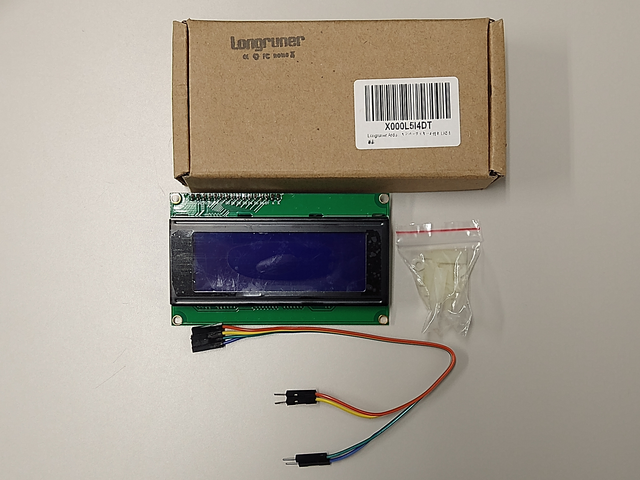
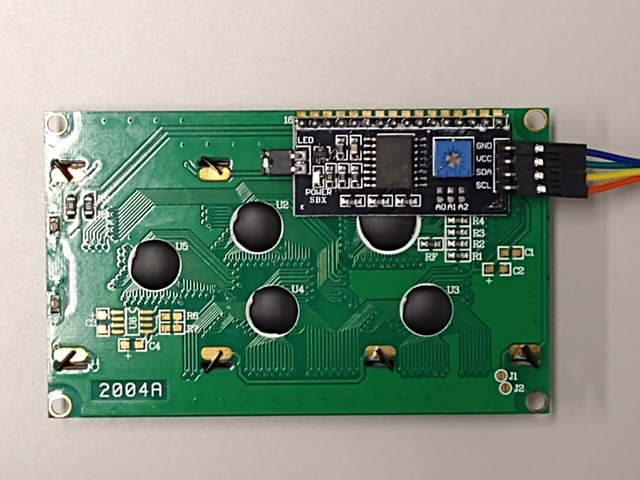
LK51はPCF8574互換のICを載せており、4本のケーブルで接続可能な4行20文字のLCDディスプレイです。
製品には、本体とスペーサーと接続ケーブルのみでマニュアルが入っていませんので、少しでもお役に立てれば幸いです。
環境
- Longruner LCDディスプレイ LK51
- Arduino IDE 1.8.13
- Arduino UNO R3
- Arduino Mega 2560
ライブラリのダウンロードとインストール
PCF8574を扱えるライブラリはいくつかありますが、以下の2つを試しました。
LiquidCrystal_PCF8574
PCF8574に特化していて、ZIPファイルにサンプルも含まれてすぐに使えます。
Arduino IDEのメニューから「スケッチ」→「ライブラリをインクルード」→「ライブラリを管理」をクリックして「ライブラリマネージャ」を起動後、「LiquidCrystal_PCF8574」で検索してインストールします。
または、ライブラリ(ZIP形式)を以下からをダウンロードします。
ダウンロードしたZIPファイルを解凍して、そのディレクトリをArduino IDEをインストールしたディレクトリの下にある「libraries」にコピーします。
私はArduino IDEを「C:\Arduino」にインストールしているので「C:\Arduino\libraries」になります。

New-LiquidCrystal
ソースを見ると必要最低限の実装に見えます。
ライブラリ(ZIP形式)を以下からをダウンロードします。
ダウンロードしたZIPファイルを解凍して、そのディレクトリをArduino IDEをインストールしたディレクトリの下にある「libraries」にコピーします。
私はArduino IDEを「C:\Arduino」にインストールしているので「C:\Arduino\libraries」になります。
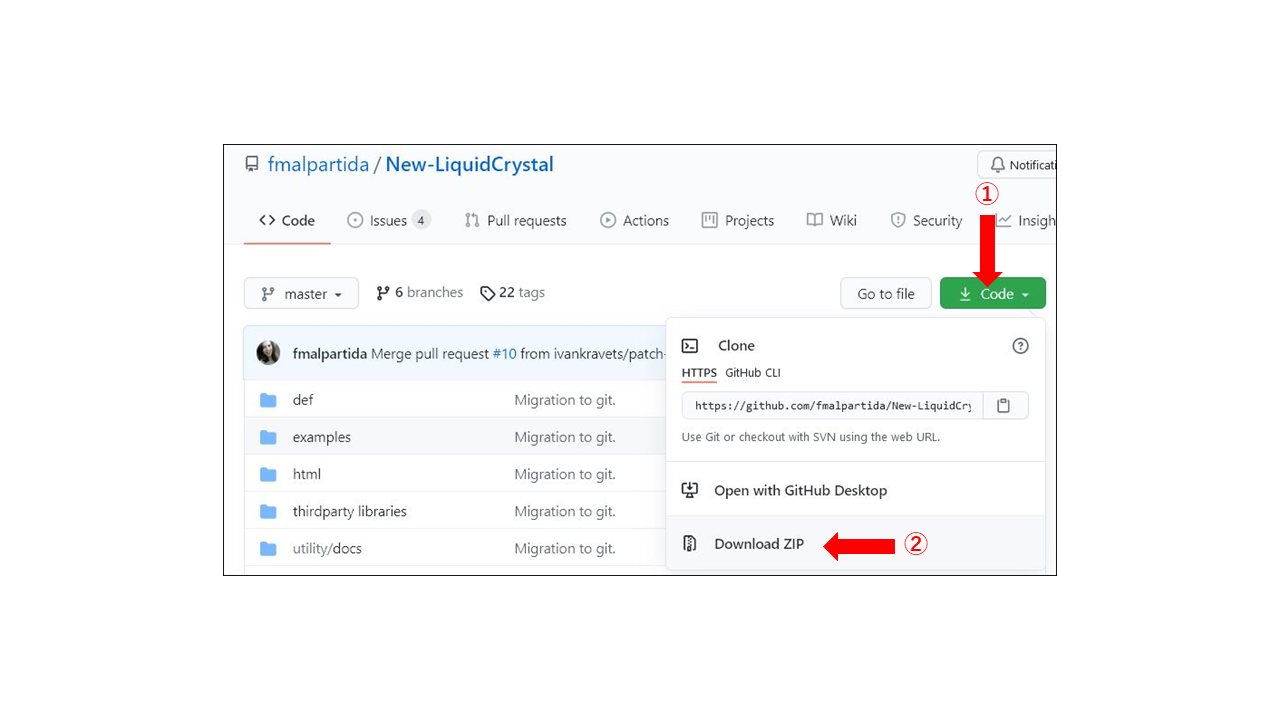
New-LiquidCrystalをダウンロードするときは下図のようにします。
配線
LK51の推奨電圧は5Vです。
ロジックレベル双方向変換モジュールを使用しなくても3.3Vで動作しましたが、背面のコントラスト調整用のボリュームで調整しないと暗いです。
また、納品時はコントラスト調整用ボリュームが最低になっていたので、電源を入れて調整する必要がありました。
Arduino UNO
LK51      Arduino UNO
----------------------
GND ----- GND
VCC ----- 5V or 3.3V
SDA ----- Analog 4
SCL ----- Analog 5
Arduino Mega 2560
LK51      Arduino Mega 2560
----------------------------
GND ----- GND
VCC ----- 5V or 3.3V
SDA ----- SDA 20
SCL ----- SCL 21

I2Cアドレス
LK51のI2Cアドレスは「0x27」か「0x3F」のどちらかです。
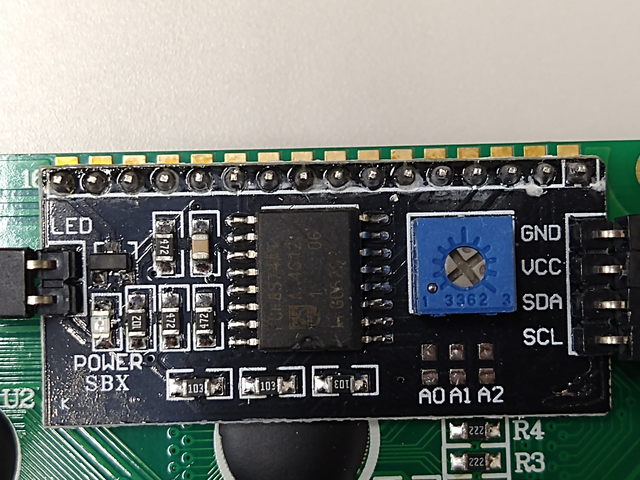
搭載しているICは「PCF8574AT」でした。
このデータシートを見ると、下の写真の右下にあるA0、A1、A2のピンの組み合わせを変更することで0x20~0x27に変更できるようです。
データシートP.5の「7.1.1 Address maps」に載っています。

ソース
購入したLK51のI2Cアドレスは「0x3F」だったのでソースで指定します。
「LiquidCrystal_PCF8574」と「New-LiquidCrystal」の2つのライブラリを使ったそれぞれのサンプルは以下となります。
LiquidCrystal_PCF8574
ライブラリのZIPファイルに含まれているサンプルです。
I2Cアドレスを「0x3F」に変更しています。
Arduino UNOとArduino Mega 2560で同じスクリプトが使えます。
I2Cアドレスを変数i2cAddrで指定するように変更しています。
#include <LiquidCrystal_PCF8574.h>
#include <Wire.h>

// 0x27 or 0x3F
int i2cAddr = 0x3F;

// set the LCD address to 0x27 for a 16 chars and 2 line display
LiquidCrystal_PCF8574 lcd(i2cAddr);

int show = -1;

void setup()
{
  int error;

  Serial.begin(115200);
  Serial.println("LCD...");

  // wait on Serial to be available on Leonardo
  while (!Serial)
    ;

  Serial.println("Dose: check for LCD");

  // See http://playground.arduino.cc/Main/I2cScanner how to test for a I2C device.
  Wire.begin();
  Wire.beginTransmission(i2cAddr);
  error = Wire.endTransmission();
  Serial.print("Error: ");
  Serial.print(error);

  if (error == 0) {
    Serial.println(": LCD found.");
    show = 0;
    // 初期化
    // LK51 4行20列
    lcd.begin(20, 4);

  } else {
    Serial.println(": LCD not found.");
  } // if

} // setup()

void loop()
{
  if (show == 0) {
    lcd.setBacklight(255);
    lcd.home();
    lcd.clear();
    lcd.print("Hello LCD");
    delay(1000);

    lcd.setBacklight(0);
    delay(400);
    lcd.setBacklight(255);

  } else if (show == 1) {
    lcd.clear();
    lcd.print("Cursor On");
    lcd.cursor();

  } else if (show == 2) {
    lcd.clear();
    lcd.print("Cursor Blink");
    lcd.blink();

  } else if (show == 3) {
    lcd.clear();
    lcd.print("Cursor OFF");
    lcd.noBlink();
    lcd.noCursor();

  } else if (show == 4) {
    lcd.clear();
    lcd.print("Display Off");
    lcd.noDisplay();

  } else if (show == 5) {
    lcd.clear();
    lcd.print("Display On");
    lcd.display();

  } else if (show == 7) {
    lcd.clear();
    lcd.setCursor(0, 0);
    lcd.print("*** first line.");
    lcd.setCursor(0, 1);
    lcd.print("*** second line.");

  } else if (show == 8) {
    lcd.scrollDisplayLeft();
  } else if (show == 9) {
    lcd.scrollDisplayLeft();
  } else if (show == 10) {
    lcd.scrollDisplayLeft();
  } else if (show == 11) {
    lcd.scrollDisplayRight();

  } else if (show == 12) {
    lcd.clear();
    lcd.print("write-");

  } else if (show > 12) {
    lcd.print(show - 13);
  } // if

  delay(1400);
  show = (show + 1) % 16;
} // loop()
New-LiquidCrystal
Arduino UNOとArduino Mega 2560で同じスクリプトを使えます。
#include <Wire.h>
#include <LiquidCrystal_I2C.h>
// Arduino UNO (Analog 4, Analog 5)
// Arduino Mega 2560 (SDA 20, SCL 21)
// 0x27 or 0x3F
//LiquidCrystal_I2C lcd(0x27/0x3F, 2, 1, 0, Analog/SDA, Analog/SCL, 6, 7, 3, POSITIVE);
LiquidCrystal_I2C lcd(0x3F, 2, 1, 0, 4, 5, 6, 7, 3, POSITIVE);
void setup(){
// 初期化
lcd.init();
// 20列、4行に設定
lcd.begin(20, 4);
// 0列、1行目に移動
lcd.setCursor(0, 0);
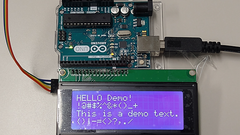
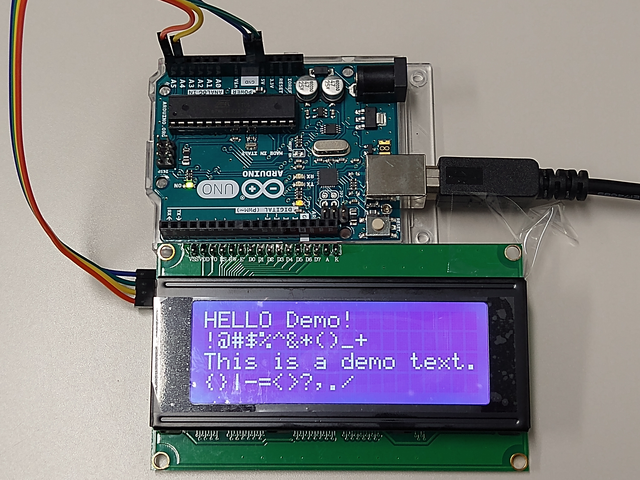
lcd.print("HELLO Demo!");
// 0列、2行目に移動
lcd.setCursor(0, 1);
lcd.print("!@#$%^&*()_+");
// 0列、3行目に移動
lcd.setCursor(0, 2);
lcd.print("This is a demo text.");
// 0列、4行目に移動
lcd.setCursor(0, 3);
lcd.print("{}|\-=<>?,./");
}
void loop(){
}
Comments